
Today we got news that our shell was moved to Sheffield last week. Hopefully we’ll get more photos of her build through from Tim. In Sheffield she will have the finishing touches of the steelwork done, followed by all the technical stuff and fit out.
Best keep our cruising ahead of schedule so that we can head to Sheffield when needed, we have a deadline to get to London in two weeks.
More photos when we get them.
Yearly Archives: 2016
2D into 3D
Today Tim Tyler has forwarded us some photos of the build. Sadly he has left his camera at the workshop, so we only have three photos so far. But more will follow.
The base plate is now rising from the floor. More photos would have been too much excitement for a Friday evening, we’ll wait for them patiently!

The base plate has been cut to the shape of the swim. Then the up stand added with the base plate shape of the stern welded to that. The base plate is the slightly browner area of floor, sat on top of it is the start to the hull sides.

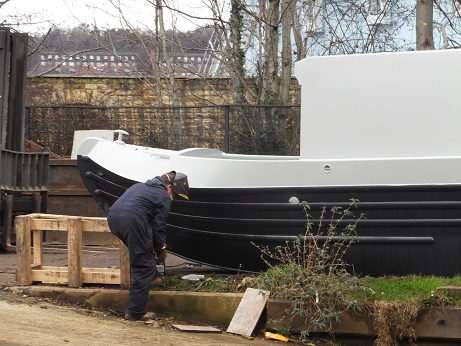
View from the outside. The pieces are spot welded into position to hold their shape. A fork lift has been used to hold the stern in place whilst work continues.

The sides of the hull on the floor. These have a 90 degree angle on the outside edge which when stood up will become the gunnels. Box section has been welded to the sides for strength and for the battening to be fixed to. Continuing towards the camera the sides have been cut to shape for the bow, it looks a bit like a shirt lying on the floor. The small holes may become the vents for the gas locker which is positioned in the bow, this is in case there is a gas leak then the gas can escape as it is heavier than air.
Apparently the hull sides are now stood up. The bow is pulled to shape and guards are on. The cabin and roof will take shape next week. Eeek!! Very exciting.
I’ll post more photos when they arrive.
No news yet.
Nothing to report as yet. We had communication with Tim on Friday and the chaps have been concentrating on the Northwich hull. But he is hoping to make some progress on Oleanna next week.
We’re looking forward to some photos.
Newcastle 15th February
With a hire car we decided to have a look at a Bubble Stove. They are made at Harworth heating near Doncaster. Two stoves were being put together in the workshop that we could look at. Terry was very helpful.
 |
| Corner Bubble nearly complete |
 |
| Deep firebox also has a fretwork grill at the front |
 |
| Back boiler |
A corner Bubble Stove with a back boiler can be pushed further into a corner of a boat as the back boiler goes around all the back and also extends over the top of the fire box, therefore absorbing much of the heat before it reaches bulkheads. These are built into the stove unlike other brands where they slot into the back. Vermiculite fire bricks surround the fire box, including to the front, where there is a deep lip which should stop hot coals from escaping onto the floor.
They originally designed the stove for Louis and Josha boat builders in Thorne.
Our problems with selecting a stove for Oleanna have been to do with the amount of space the stove needs, how far the BSS says it has to be from bulkheads, the size of hearth surrounding it, the double skin flue and then the lack of space ontop of the stove for kettle and cooking pots. If your stove is alight it is free cooking heat without extra moisture going into the air that LPG cookers give you.
 |
| Being a triangular top gives you space for two pans. Inside there is a stainless steel grate |
The Bubble has two areas where you can put a kettle, but it seemed to have an up stand around most of the top, which would stop this being possible unless you had small pans. Terry showed us a stove with a cooking rail round it, which would prevent pots sliding off but enable them to overhang the top. We weren’t too keen on that solution as it would be in the way of our bathroom door. We discussed if it was possible not to have a rail at all and Terry said it was and it would not cost any extra, it may even cost less!
 |
| Fancy guard |
The problem with the double skin flue, Terry has complained to BSS about it. He believes that a guard instead is a much safer and a better looking option. He showed us one which was quite fancy with fretwork and bits of brass, we’d want a plainer one, which is possible.
After turning down the idea of a Bubble Stove with an oven above it, too domineering for Oleanna, we came away quite happy with what we’d seen, only the price tag is quite a bit with a back boiler. Free heat from a stove isn’t quite so free after all!
 |
| A Josher and Northwich in the background. |
Then we headed across country to Newcastle under Lyme to Tim Tylers workshop. The industrial estate is the same as many, lots of grey units that all look the same. Lucky for us the front doors were open and the bows of two boats were visible, we were in the right place.
 |
| The central weld |
 |
| Mick stood 58ft 6 inches away |
The Northwich and Josher were sat in different states of completeness leaving a gap to one side of the workshop. Tim told us that our steel had arrived this morning and the base plate had been laid. There she was 58ft 6in of 10mm steel on the floor. The base plate is made up of two sheets which had already been welded together on the top. At some point they will be raised off the ground and be welded underneath too, the underside will also receive a coat of blacking as a standard part of the build, not many builders do this.
 |
| Marking out of the stern and swim |
Towards the back of the steel, templates were laid out and the stern curve had been marked out along with the swim. The curve of the swim extends to 13ft from the stern, so a bit further than we’d estimated when at Jonathan’s. We double checked that Tim knew the spec for the hull and he had received my back to front plans.
Tim’s workshop will build the majority of the shell leaving window cut outs and bulkheads until it is in Sheffield for finishing. He suggested that the hull would be more or less done in the next two weeks, this is quick compared to most builders, but it is what they do every day, they build a lot of boats!
 |
| Tata |
NB Oleanna’s steel has come from Tata Steel and there will be around 10 tonnes in the hull. I doubt our one boat will make much difference to the British steel industry, but it’s a small help. Tyler Wilson gets the baseplate steel milled wider than most builders. This gives you what is known as a Birmingham square which means that the floor space in the cabin is wider and the sides of the hull can be upright instead of angled.
 |
| Piles of sides |
 |
| Machined 90 degrees |
Alongside our hull were stacks of sheet steel for the hull and cabin sides, some had a 90 deg angle already machined into them. Some of these will be Oleanna’s sides.
As the workshop carried on being very busy and noisy we chatted with Tim (well shouted at each other over the noise). He will send photos of the construction to keep us upto date with the build as the next time we see her it is likely to be in Sheffield.
Very exciting times!!
Version O 9th February
Well we thought we’d settled on our layout. A while ago we’d talked about having the stove on the port side of the boat, therefore less likelihood of the chimney being knocked off while cruising when coming across situations where you have to move to the right whilst passing other boats, over hanging trees, bridges. I’d put Oleanna’s stove on the starboard side. To move it, all we need to do is flip the boat over, a mirror image. So today the tracing paper plans have been rescanned, noted that they are meant to be back to front and sent on to Julia to forward on to the builders to save time.
NB Oleanna will start life at Tim Tyler’s boat yard in Newcastle-under-Lyme and then move to Sheffield to have the shell completed, Phone calls with Julia and Tim suggest that the baseplate will be laid next Monday or Tuesday, confirmation will be later this week.
Things are moving fast all of a sudden. Luckily my plans are good enough for the shell to be started, window positions etc whilst the CAD versions are worked on by someone else with the finer detail. They can flip the boat over on CAD easier than me!
 |
| Bubble Corner Stove |
We may have found a stove that will fit and work for us. A Bubble Corner Stove with a back boiler can be fitted closer to bulk heads due to it’s wrap around water jacket. It is a corner stove so the flue is central, but the sides hopefully extend far enough to put a kettle or cast iron pot on. I had a go at drawing up a 1:1 scale version on our table. The website gives you all sorts of dimensions, sadly not quite adding up to what appears in the drawings. But taking the smallest dimensions, adding an inch to the flue for a double skin, it is possible to fit our cooking pot on it with only a small overhang. Our only possible drawback is that it appears to have an up stand around it, which would mean getting much smaller pots to cook in and a new kettle. We have asked the questions and wait to hear back from them, Fingers crossed.
Research on the composting toilet is on going. Our friends Bridget and Storm have the model we are looking at and have very helpfully sent us photographs of their urine tank and storage for it. A 20 and 25 litre tank are available from the suppliers in England which are 140mm deep plus the screw cap. This may be possible to have under the floor, but the gauge wouldn’t be visible in this position.
Meeting 3. 8th February
Ken and Julia braved all that storm Imogen could throw at us to join us on NB Lillyanne for our next meeting.
My plans of version N prompted a couple of questions, but they were soon answered. So the layout is agreed.
 |
| Hobbit |
A change of orientation for the stove and another look to see if it is going to be possible to use it to cook on, as we do currently. The new BSS regulations with double skinned flues, hearths of specific dimensions and space between the flue and boat all make fitting a stove on a boat very hard if you want to be able to walk past it, sit down, etc. If our galley was smaller then it would be easier, but our current galley is only just big enough for us. Our original thought had been to have a Hobbit stove with the flue coming out from the rear of it, therefore being able to use the whole of the top for cooking. Nothing beats a slow cooked stew on top of a stove and jacket potatoes cooked in the fire itself. The Hobbit is about 2/3 the size of a squirrel, so therefore to be able to fit anything on the top the flue has to come out of the back. But this may not be possible as it would push the whole stove further into the limited space that we have. So thinking caps back on as to regards the stove.
 |
| Villa 9010 |
More research is needed regarding the composting toilet. The one we are hoping to have needs a separate urine tank, which we believe needs to be sourced by ourselves and located somewhere with easy access to be able to empty it. This then led to long discussions as to where to have the tank, how easy it would be to empty it, did we need some sort of pump to an outside outlet that we could empty it from. We are not sure if not knowing all there is to know about the toilet is making things more complicated than it needs to be, or have we struck on a good solution. So a few phone calls are needed to fill in our knowledge gaps.
Discussions over boilers were had. Mick sometime ago had done research on an Alde Gas boiler that needs little electric and if you are hooked up it could run off the mains. This boiler we have discovered since the meeting would only run off a 12volt supply and we were keen on having 24volt. So a rethink there as well.
In the cratch we discussed two or three lockers, a folding down table or not, all things to think about. Glazed stable hardwood doors into the bedroom from the bow. The internal cabin sides and ceiling are going to be cream painted birch ply with a simple oak framework, with an H joint to help with temperature changes. Below the gunnels will be oak faced ply, quite simple as there won’t be much of it on show.
 |
| maybe a bit like this |
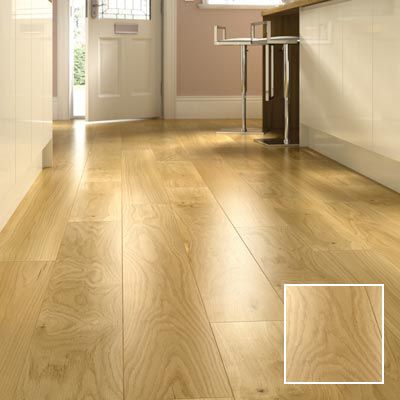
Flooring will be an oak engineered flooring, style still to be decided. In the bathroom we will have either an Amtico or Karndean flooring. The design of this will be decided when fabric and laminate samples arrive. In the bedroom we will add rugs so that we are not stepping out of bed onto a cold floor.
Our home work list includes looking at sinks and taps, cookers, what granite we would like in the galley and bathroom.
Ken and Julia said that there is a strong possibility that Jonathan will be laying the baseplate either later this week or next week as he can slot our hull in between others. This may well mean that the hull will then have to wait to be fitted out, but that is fine with us. We hope to be able to get up to Sheffield for the very start, this may be at quite short notice. Exciting times!!!!
Version N
The last couple of days have been spent updating plans to Version N.
 |
| Elevations |
The swim meant that I’d need to move the fridge further down the galley. Wanting to keep the sink and draining area to a corner, this meant moving the fridge to the other side, swapping it for cutlery draws and a cleaning cupboard. It would still need to move further down the boat though. Slotting in a gap of just over 300 helped, it also gave me a home for one of our bikes. The other could live at the bottom of the wet locker. One bike gets used more frequently than both, so the second can afford to be tucked away a little bit more. Hooray, hopefully a solution.
 |
| Outside looking considered |
With the layout plan updated I finished off the port and starboard internal elevations, positioning the windows as I went. I then did an external elevation of both sides just to check that the positions looked well spaced and they do.
With the plans copied and scanned they have been emailed to Ken and Julia. We are quite happy with the layout , but are hoping that we haven’t made any daft mistakes which would have knock on effects. We’ll wait and see what the reaction is to them.
 |
| 1:25 Scale model |
Then I couldn’t help but start on a scale model. A few years ago I made one of a 58ft cruiser stern NB Oleanna. She has now grown by 6 inches and is a semi trad so I have had to start from scratch. The bow and stern of the model won’t be accurate in shape. This is possible but would take longer to make and I don’t have the dimensions of a Tyler Wilson shell to build from so I’d rather a suggestion of the shape instead. I have wondered if there would be a market for such models when people are planning their boat layout. I could provide a hull and furniture that they could move around until they are happy.
The model is made up to the gunnels and the bow and stern bulkheads are ready to go in. Until we hear back from Ken and Julia there isn’t much more that can be done.
 |
| Houdini was concerned at the size of her cat flap on the original model. We will still have feline access, just need a new ships cat. |
Josher or Trad bow 25th January
 |
| It’s all in the detailing |
When we arrived at the yard the office was closed, but we had seen fork lifts moving around as we’d approached on the tow path. Jonathan came up to say hello, he was just about to move a shell into the bottom workshop so he’d be with us shortly. We were more than welcome to look at the two boats in the fit out workshop, admittedly both were Josher bows, but had bow thruster lockers, so we could check if the bikes would fit.
 |
| No way would the bike get in there! |
A carpenter, Jeremy turned lights on inside one of the boats so that we could have a look. The bow thruster lockers had access via a vertical opening, which would mean angling our bikes in through the opening to get them into the main body of the locker. This was not possible, the bike was too wide for the diagonal. We checked what height there was above the motor on the bow thruster and this was not big enough. Elsewhere there was plenty of space, but not enough for two bikes and any way you couldn’t get them in to start with.
 |
| Quite a feature in your galley. |
 |
| Painted birch on ceiling, oak on side |
We went inside and had a look at the fit out that was on going. A reverse layout as we will be having. The ceiling and above the gunnels were white with oak trim. I noticed that the white panels where on two different surfaces. Birch and Oak veneer. The ceiling will be lit from the sides with LED lighting cast across it, so the owner had asked for a plainer finish here, the birch. On the walls was the oak, which in parts had too much grain for me and I would think that the paint had run, even if it hadn’t.
In the galley there was a large Heritage stove diesel fuelled. Boy it was big. The double insulated flue was wide and with the calorifier perched in the corner behind it, it certainly was a feature!
 |
| The swim |
Nosing around the galley we got chance to measure where the swim affects the rear of what will be our galley. The swim curves inwards to the prop below the water line and whilst planning the layout of Oleanna’s galley I’d forgotten just how far it comes. At the rear bulk head it is 8 inches wide, reducing to 2 inches at 2 ft and by 4 ft away it flattens out. Ah I’d positioned a fridge in the last 2 ft! That would have to move elsewhere.
 |
| Curvy steps |
 |
| Under all the oak this is what they look like |
The other boat was also a Josher with what looked like a standard layout. Curvey steps brought you down into the saloon, followed by a pullman dinette, galley, bathroom. Beyond this was the engine room, which was still all spray foam, cables etc. The lining was fancier with extra beading.
 |
| Fancy beading |
By now Jonathan had joined us and discussions as to where our bikes could live began. When we had last visited there had been a different style of bow thruster locker on a trad bow that you accessed from above, horizontally. Our thoughts at the time were that the bikes would easily fit. In the bottom workshop two hulls were having their paint baked, one of which had such a locker. The bike easily fitted in through the opening, but the depth was the problem, 11 inches too shallow. Several other options were discussed, but they would affect the lines of the boat and what is the point of that. Maybe the stern lockers.
Back to another boat. With lockers extended to right behind the back cabin doors we would just get enough width at this end, but not enough elsewhere. A re-think needed, maybe loose a bike, find a cupboard inside to accommodate them, incredible shrinking/growing machine (I really must patent that!).
Back to the bow shape and how much space bows and sterns take up. Jonathan confirmed that a Josher has at least a 10 ft bow, a Trad bow 9 ft. A semi trad stern needs to be 7 ft 6 inches with the back deck being 3 ft 5inches. With all our questions answered and measurements taken the decision on bow style was the last thing.
My photos don’t quite do the bows justice.
 |
| Trad bow |
 |
| from above |
 |
| in profile |
A trad bow has very pleasing lines, gives us an extra foot of cabin space, but reduces the well deck.
 |
| Josher bow |
 |
| in profile |
 |
| from above |
A Josher is prettier with more curves, reduces the cabin space, but gives more well deck.
Our heads have won and we will be going for a Trad bow at 58 ft 6 inches, internal space being more important.
Versions K, L and M 22nd January
Last night we decided that we should go to Jonathan Wilson’s yard to have another look at a Trad bow. We can get to Sheffield by train easily at the moment, so a phone call to make sure a suitable boat would be at the yard for us to look at was made. The answer was, “Yes, I’ve got everything here”. So we plan on heading there on Monday to compare boats again, this time with our heads and not our hearts! We will go along with one of our Brompton bikes to check that it will fit in a bow thruster locker without too much adaptation.
With a couple of questions for Ken answered I was ready to start again with the layout.
Our latest version of drawings started in June last year seem to have gone AWOL, nowhere to be seen! But with NB Oleanna version H plans in the boat box I had enough information to start again. Being able to look at it a fresh was good.
Since version H quite a bit has changed, no longer a cruiser stern is the main difference. I decided to start with the dimensions of a 58ft 6inch Trad bowed semi trad. Taking away 9ft for the bow, 7ft 6inches for the stern deck I already had more space than version H had had!
Working from the bow I traced in the bedroom (10ft), leaving which side the bed would fold out until other areas were sorted. This was so that the washing machine can be on the right side for pipe runs. After marking out the basic dimensions of each area I set too to try and work out the galley.
With the calorifier being in the engine bay, that frees up a lot of space in the cupboards at the back bulkhead. Our current boat NB Lillyanne has things that we really like in the galley, others that are plain daft. But the general layout works for us. There is a cupboard by the back steps that currently houses a bike, folding chairs and our wheelie shopper. These all will have other homes so the equivalent spot could be used for maybe a dishwasher. Sketches and head scratching went on for quite a while until a layout seemed to work.
 |
| Version on version, sketches and notes. |
The space taken is the same as on Lillyanne, 10ft. The only thing I didn’t manage to fit in was a freezer. We only need a small one and would happily have a counter top one with a 30 litre capacity, but there is no counter top spare. So Mick spent some time trying to find one that could live in the base of the dinette. Somehow, some way I managed to have enough space to fit a full width cooker! The best thing in Lillyanne’s galley is the draws that we use to store food. These are the same height as a large bag of flour and can store an incredible amount if kept tidy. In Oleanna’s layout these are wider, which may end up being too heavy and therefore be better being halved making four draws. On Lillian there is a narrow larder unit that pulls out, it has two baskets and is quite a waste of space, but with a similar space left on Oleanna a better version wasting less space might be achieved.
The galley is an L shape, the last unit that crosses to the centre will be on runners so that you can pull it out to get at the corner cupboard with ease and then lock it back in place when finished with, a very good idea from Ken and Julia.
Next comes the L shaped dinette, this needed an area for me to store my drawing board, drawing equipment and model making bits and bobs. These are all currently stored under the dinette seating, earlier versions of Oleanna had the drawing board stored under the floor of a raised dinette. But getting it out would put me off doing work, it needs to be in an easily accessible place but not in view. So a 6 inch slot between the dinette and galley should do this and give some space to store model materials too. Under the dinette there will be the usual storage, mainly for spare bedding and work things.
Now came the hard bit, the saloon. There is enough space for a three seater sofa, so therefore a single bed. This however would give us seating in a straight line as we had on our shareboat NB Winding Down. Fine when it’s just the two of us. Our current configuration is with a 4 ft sofa with it’s back to a bulk head which makes for a more sociable space. But the positioning of a stove is also hard. Regulations now dictate the size of hearth around a stove, how far away they have to be from the sides of the boat and a double skinned flue.
With three versions of the bathroom and saloon drawn up for discussion, we have narrowed it down to two. More work needs to be done to see just how the stove will impact on the saloon before we can make a final decision.
Mick has been collecting information on white goods, bow thrusters, engines and travel power, measuring things and checking on dimensions on the internet as I’ve needed them all day.
An intensive day of work really, at least I can still read a scale rule after not doing so for work for a year. I’m hoping that this weekend we’ll be able to choose which layout to go for and then do some elevations to show Ken and Julia. On the main I’ve managed to keep the plumbing to one side and keep the toilet out of view. Then if there is time I won’t be able to help myself but to make a model.
Meeting 2 . 21st January 20016
 |
| Old and new plans |
Ken and Julia came to visit us on NB Lillyanne today to get the ball rolling on the layout for NB Oleanna.
They had with them some basic sketch plans and some hand drawn visuals of parts of the interior for us to look at and discuss. It is quite a while since we met with them in Sheffield which meant that we needed to retrace our steps a bit.
We worked our way from the stern to the bow talking about layout. With still quite a few decisions to be made we couldn’t pin the layout down totally today.
The main decision would be on the bow of Oleanna. When we had gone to Sheffield for the open day we had seen both Traditional bows and Josher bows. The trad bow is a lovely shape, but the Josher is beautiful. But beauty costs, an extra £4,000 and another foot of boat length at least. Trad bows are 9 ft long, Joshers at least 10 ft but better if 12 ft. At Meeting 1 we had decided to go for a Josher, adding 6 inches to Oleannas length which would help inside but not hinder us in short Yorkshire locks.
Having lived on board NB Lillyanne now for 18 months we know how we live on a boat and how much space certain areas need. The galley is important and living on board full time requires for me a fully equipped kitchen. We eat out once every so often, but I enjoy cooking, so space for ingredients (including winter emergency stocks) is needed. So the plan of the galley needed re jigging. Ken had given us a bulk head and door between galley and dinette, this wouldn’t suit us. When people are visiting it’s nice to be able to chat to them as you cook or make drinks. Being able to see down along the boat also helps keep the boat open and appear more spacious. So an extra full height cupboard was discussed to be added to the back of the galley by the electrics cupboard. On Lilllyanne we have a small cupboard at the end of our galley high up above a worktop, but I find it impossible to reach the top shelf of this, so a cupboard that you can stand in front of would be better.
White goods were discussed. A double oven (although there are not many LPG options available), 4 ring hob, a +++A rated fridge, a dishwasher. Originally we had looked at draw dishwashers, as we have one at home, these have a smaller capacity to the slimline ones, but are wider, however the space below one could be utilised elsewhere. But the difference in price between the two is quite large, saving a few pennies here and there may add up to a reasonable saving or money towards something else.
On our first visit to Sheffield we had changed our mind from a Pullman dinette to an L shaped one. When I have work to do I need quite a bit of space and being able to stand as I model make means that an L shape would work best. It also opens up the space more. Somehow Ken must still have had our original spec where a pullman was mentioned. Both options take up a very similar amount of space so this had no effect on the general layout.
Saloon, well that is where everything gets squashed somewhat. We want somewhere to sit and relax, a stove, hopefully that I can cook on, possibly a back boiler, and some shelving for books. At Oleanna’s current length this area is very tight, a sofa bed an impossibility. So various options were talked over. A more comfortable dinette where we could sit to watch TV, chairs, a sofa with out a bed. The most people we have had to stay has been three, my nephew being one of them, he could sleep on a blow up mattress or the floor. Having a sofa where one person could layout lengthways might be possible, so more thought there.
Bathroom. We have made the decision to have a composting toilet. Various reasons, not having to empty a cassette every couple of days is one, the other £15 a time to empty a tank and the timer might run out on you all adds up. The idyll of your waste composting and you being able to dispose of it in nature doesn’t quite work on a boat, but visiting an elsan every six weeks for free is attractive. This means that as long as the toilet can be vented it can go anywhere and isn’t reliant on water or holding tanks. Shower, towel rail, and a sink just need positioning so the toilet can’t be seen whilst eating tea at the dinette.
Having a cross bed gives us back 18 inches that an in line bed would eat up. The best solution for the layout is still our original from about three years ago. Many things have changed with Oleanna since then, but not this. I had made a 1:25 scale model so was able to show Ken and Julia our solution.
Adding the areas up we were still extreamly tight. A compromise on either the interior or bow is needed.
Then discussions on a Travel Power were had. Mick is of the opinion that Travel Power is the way to go when you have a washing machine on board (in the bedroom). Ken talked through the different options for power, a generator, working off the 3KW invertor as Travel Power is nearly as expensive as an engine.
Then the numpty/girlie button discussion was had. Ken is of the opinion that electric bow thrusters are not worth the money, they run out of power quickly and charging the battery is problematical. Hydraulic is the best but costly and do we need it anyway. However having said that he is of the opinion that having a boat built you should have a bow thruster tube installed for future. We wouldn’t use it often as some do, but in emergencies it would be good to have.
Julia gave me some websites to look at regarding finishes for the galley, bathroom and furnishings and a link to some radiators for us to look at.
We have quite a lot of homework to be getting on with. The drawing equipment will be out and new versions drawn up over the weekend until we are happy with what we have, hoping that we haven’t done anything foolish with the plumbing. The hope is that we can finalise the layout in the next two weeks, at that point CAD drawings will be done and then Jonathan will slot the hull into his build schedule. We have mentioned that we would like to be in Sheffield for the base plate being laid. I have a feeling there will be “The” photo of us standing on it before work is commenced.