
Visit 3rd August
Before we cruised away from handy train stations we arranged to visit Sheffield to see how things were progressing and see if there were any questions that it would be easier to answer on site.
The carpenters hadn’t been told that we’d be around but were happy for us to go on board before Ricky and Louis joined us. It looked like virtually all the wiring had been put in and most of the engineered oak flooring was down. Most of the cupboards were off the boat stacked up in the workshop. Most have now had the satin lacquer applied to them where they will be seen. I’m very used to seeing things in this state as it’s far easier to apply finishes when things are in pieces.

All of our bedroom was stacked up with a couple of drawers that will go in the cupboards for socks etc. You can see on the side of the bow steps that the top surface has had lacquer applied but not the sides as these butt up to cupboards.

Holes have been drilled in the cabin at the bow for the navigation lights and cables were showing on the starboard side.

The insides of the hatch have been clad now with oak. The insides of the steel doors have also been painted to match the stripes on the exterior. A nice touch, except the red stripe still needs to be addressed.
The rear cupboard and bike slot were in position inside Oleanna and I checked the measurements of them. Our bikes would fit, but only just at a squeeze. A hiccup in translation, they normally work to overall outside dimensions of cupboards. Luckily we’d spotted this now rather than when all the appliances were in place. Having a very close look at our bikes we can move the saddle slightly which should give us back some tolerance in the rear cupboard. The slot will be altered to give us a bit more height.

Wiring hung from the ceiling everywhere, coiled up ready for back boxes, fittings, switches and sockets. The cabin sides were half in place, some had been removed to start cutting the window openings in them.
The insides of the food drawers can be seen just next to Mick. They still need drawer fronts adding to them.
The ceiling in most of the boat is still unclad, but in the bedroom (sadly didn’t get a photo) it is up with holes for the lights already cut.

All the cables run back to the starboard side rear cupboard which will be the electrics cupboard. Here coils of many colours hung all labelled.
The thick blue cable is the 240 volt ring main and the grey coil is Cat 5 that we will have running to the TV and dinette area. The others well I have no idea!

This is the corner of the saloon by the bathroom. A hole has been cut for a double socket below the gunnel, the blue ring main is looped through it.
A section of the engineered oak floor is visible, most of it is covered for protection with cardboard. There is a section of floor that is just plain ply, this is where the sofa will sit. Most areas where cupboards, beds etc cover are done this way as they will never be seen. However if there is enough of the flooring left over this is an area that may get seen as the sofa is a stand alone sofa bed which may in years to come be replaced, revealing the floor.

In the bathroom the plumber has started. The hole in the floor is for the drain from the shower. A cross member of steelwork has had a section removed to help with this. Pipes for hot and cold water come up from below the floor.
The composting toilet and urine tank are on order along with the sink and taps for the bathroom.
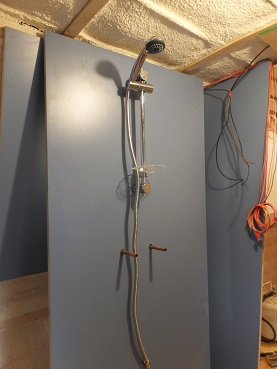
The panel that the shower is fixed to is not in it’s final position in this photo. Fixing it all together whilst the panel is loose makes it a lot easier to reach the back. The two copper pipes protruding will be for the hot and cold water. On our old share boat at one time the tap and temperature control in the shower were very smooth, which made it almost impossible to turn off when you have wet hands. We checked that our tap has some grooves on it.
Discussions about positions of sockets on the dinette were had, as the dinette seating has had to be raised slightly to house the freezer this means there is no space above the cushions for sockets. So all power will go on the end of the dinette along with the Cat 5 sockets.
We have now had a price for Lithium batteries given to us, which we are really interested in as we shouldn’t have to replace them for about ten years, maybe more. Before we go ahead with it we need to know a little more regarding the charging voltage of the alternator and means of connecting the solar panel either via a dedicated MPPT controller or directly into the inverter/charger. We have also asked if space can be left by the battery bank, so that if we discover that we are running out of power in the first few months then we would be able to add an extra battery wired in parallel. We hope this is unlikely, but we’d feel happier to have the option available to us.
Although little was in place we were happy with the progress that is being made.