Visit 18th August
You’ll have noticed a few changes here on our blog. Once we are on board NB Oleanna this will become our cruising blog, leaving NB Lillyanne behind. So every now and then Mick is adding bits and bobs to it.
As two weeks have passed since our last visit and it sounded like there would be quite a bit to see we headed to Sheffield from Goole.


Oleanna has been joined by a shorter boat in the fit out shop which is at the spray foamed stage. Piles of boxes surrounded Oleanna as all the appliances have now arrived. Some have been installed others like the fridge, freezer, toilet and Alde boiler are waiting to go on.


Outside on the port side the water filler and overflow have been added on the gunnel. The stainless steel tank has also been fitted under the well deck. As yet we don’t know what volume this holds, but as we will no longer be flushing the toilet our water needs will be reduced.

The most noticeable change inside the cabin is that all the cabin side panels have now been fitted and the window openings have been cut in them. Although these are currently covered in plastic, to help reduce the amount of dust on board, the amount of light inside is great. We are big fans of natural light.
Where the openings have been cut extra spray foam is being used to fill any cavities left by the window. Hopefully our windows will arrive soon and we won’t have the problem as happens on most house builds, waiting for the glass to arrive which holds everything else up. Luckily on a boat you can crack on with other things.

In the bedroom the ceiling is up although not fully finished on the panel joins yet. One lonely light fitting had been put up to show us what they would look like through the boat. We liked the oak surround. Not having any power on board yet meant there was no point in putting a bulb in.

The wiring is now in for our bedside lights under the overhead cupboards. These lights will have a narrowed angle to their focus so that each will only illuminate one side of the bed. In the corner by the bedside table is the wiring for one of the switches. This will just be a small switch. Next to this on the side of the cupboard we will have a double socket and a usb charger.

Under Mick’s bedside table is our washing machine, snuggly fitted into a cupboard. A few years ago we saw a boat at Crick with the washing machine in the bedroom and thought what a good idea it was. You can put your dirty clothes straight into it out of the way. This is also a condensing drier, which empties through the same pipe as the washing machine does.
A thin cupboard with shelves sits on top.

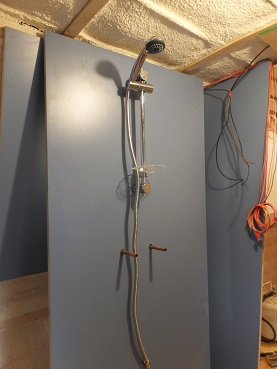
The bathroom has been mostly lined with blue laminate. The underside of the gunnel has been finished off with oak trim. The gap in the blue is so that pipes can be added from the urine tank (which will be below floor level) up to the gunnel so that we can empty it with a built in or hand operated pump. We will have both should the electric one fail.


The shower is now in position, still with the taps to be added. The cardboard on the floor is protecting the shower tray. Behind the shower and under the gunnel are three shelves for storage. The small switch will work the shower gulper, this pumps the shower water up over the side of the boat as the shower tray is below water level inside so needs a helping hand.
This bathroom door is hung, with it’s door furniture.
The ceiling is still to go up in here. This has been delayed as the only space big enough for our 250 watt solar panel is above the bathroom and saloon. So the cables need to be run in for this. Once they are in the ceiling laminate will be glued in place.

This area is where our sink will be. I chose an oval sink which will go across the corner. Paul the chippy had some questions for me about this. On NB Lillyanne our current boat, our cat has her litter tray in a cupboard under the sink. This is a good place for it as we go to the toilet in the bathroom too, it doesn’t get in the way, it is where it can be cleaned easily and she gets a bit of privacy.
The problem is she is not a standard cat and does not sit down when she goes to the loo, so needs more of a plastic crate than just a tray. Now that they have the sink the cupboard can be made, but fitting a rectangular crate into a triangular cupboard was making it rather big for the space.
Paul had cut out a template for the crate and then drawn out a plan of how he saw the sink working in the space there is.

We scratched our heads for a while and then decided that it may be better to have the whole thing open underneath. So float the sink. All the gubins, pipes etc and underneath of the sink will be hidden behind a cupboard which hopefully will have enough space to give us a shelf too.
If it is possible to just float the sink with it’s cupboard and granite surround that will be great, but should the need arise two chrome poles could be added to help support the front edge. This will leave plenty of space underneath for Tilly’s crate. I hope she likes it!

The TV mantel has been made. The opening on the top right is where the TV will be, mounted on a swivel arm, so that it can come out from the recess to access the slot in it to play DVDs. This unit will also house a digital car radio and a PVR. We should have space left over for DVD and CD storage. All the sockets will be hidden behind the panel on the top left.
The piece of wood next to this is what we call the Houdini Shelf. This will be fixed to the cabin panel above the TV mantel so that our cat can have a great view of all that happens outside. We were asked if the TV mantel would suffice for this, but it is a good 8 inches below the bottom of the window, how is a cat meant to snooze and watch the world at the same time?

The end of the dinette has back boxes for double sockets and a double gang CAT5 socket. The CAT5 is so that when we are moored in areas with numerous WiFi signals we can connect to our router directly, therefore avoiding our devices getting confused as they do currently.


The dinette was in position. The backs are slightly angled for a comfier sitting position. There is a lip which will help hold the cushions in position. Behind the seats is a narrow shelf. We know that we will end up putting things on this, but it serves to cover storage for a drawing board and model making materials. A section of the lid and the side open up for access.

The galley now has most of the cupboard and drawer fronts on. Masking tape handles are in pace to help open them. The corner cupboard behind the dinette is on runners so can pull out to reveal the contents right in the corner.
The dishwasher can be seen here. I think we may have to buy a few more plates to fill it even though it is a compact one.
Corner shelves are on the right, under these is where our cat Tilly will have her food bowls, just out of the way so we don’t kick them.

Opposite the dishwasher is the cooker. This has to sit slightly proud from how it would normally be fitted in a kitchen so that the back rings are a safe distance from the cabin side. The doors of the oven and dishwasher open fine, but a mental note of making sure the opposite one is fully closed will have to be made as there is only just enough space.
The vent at the rear of the cooker will mean that the cabin panel above will need a bit of adapting to reflect heat away from the cabin side. So a section of the oak frame will need to be removed and replaced with stainless steel.

Beyond the cooker is a gap for the fridge, then a slot for one of our folding bikes. Below the slot is a small drawer. This helps nudge the bike up so that it can sit partially over the swim of the boat, meaning it can go further in.
As yet I’m not sure what we’ll put in the drawer, but I know it will be filled very quickly when we move on board.

Opposite the bike slot is the stack of drawers. The fronts of these and the cupboard above them have been made from one sheet of oak, so the grain follows through from ceiling to floor. Between them and the dishwasher is a cupboard which will house a pull out larder.
The starboard side of the galley has a thin MDF work top at the moment, this will actually be the template for the granite tops to be shaped from. The sink and tap positions still need to be marked on them.
The electrics cupboard still has all the wiring coiled up inside. This will eventually have doors over them. The back steps are off the boat at the moment to make access into the back cupboards a lot easier.
One bit of homework will be to find some simple low profile handles for the galley units.

In the engine bay, not much has happened as yet. Until a final decision is made on the type of batteries we are having the engine can’t be ordered. We are still waiting for some information to come back regarding the Victron inverter/charger, the solar panel controller and the domestic alternator before we finally make our minds up on this.
So the engine bay stays dusty for a while, cables and pipes wait to be connected up. The stern gland is visible at the top of the V, this is where the prop shaft goes from being driven inside to revolve the prop on the outside. A gland which is packed with grease stops water from coming into the engine bay
The engine will be one of the last things installed as it gets in the way of everything else being fitted as it is quite a big lump.

Outside on the starboard side cables for tv aerials have been brought through where there will be a socket for us to connect the aerial.
Also here we will have a socket for our 4G internet aerial, which we are likely to fit onto a heavy base to sit on the roof.
Today we broached the subject of a completion date. In the autumn we have to be on the other side of the Pennines, Our hope is that Oleanna will be ready in time for us to move on board in Sheffield, put NB Lillyanne on the market and then head over the Leeds Liverpool Canal to get through a stoppage on the Bridgewater Canal that starts at the end of October. We are mindful that we don’t want anything to be rushed for the sake of it. So hopefully in a few weeks we will know better if this scenario will be possible. Otherwise we will need to find somewhere to launch her and move NB Lillyanne there to meet her.
A very good visit, lots of questions asked and answered on both sides. Things are getting very exciting!