Shortly after Crick Boat Show I emailed our idea of the paintwork over to Finesse in Sheffield and paint colours were confirmed. Sadly the shade of blue that we’d been wanting couldn’t be mixed as a two pack paint, it is only available as an oil based paint. So the next best blue was chosen. I had asked to be able to chat through what I wanted with the painter as a design on a sheet of A4 is not the same as looking at the side of a hull.
 |
| Model |
When we’d been trying to find the right colour blue we’d made note of several boats with it, one of these was a boat that Ken and Julia had built at Fernwood several years ago. The lines on the cabin sides were similar but not the same as my design. Somehow my request of a visit was lost in translation and lines were painted on the hull in a similar manner to the Fernwood boat . First we knew of it was when a couple of photographs were sent through. The positioning was good, the size right, but both lines on the cabin sides should have been the same, not a mirror image of each other. So the bottom line has a shadow above it, which is not what I’d wanted and I’d not had chance to explain the design to anyone.
 |
| Model Sign writing |
I’m sure they’d been expecting me to say that the paintwork looked wonderful and were surprised at my reaction. Apologies came back and our next meeting was arranged quickly.
 |
| Model Galley |
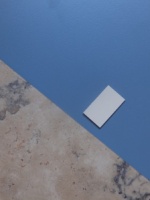
Our cruising plans on
NB Lillyanne were being disrupted by the River Trent going into flood, so we decided to sit out the high levels in Nottingham. I made use of this time to colour up the 1:25 scale model I’d made. With the exterior completed I then moved on to the interior, until everything had suggestions of colours on them. My hope is that this will help as a visual reference to the builders and ourselves just as a model is used in producing a play.
Meeting 23rd June.
 |
| Bathroom finishes |
More samples had arrived with Julia, both fabric and laminate for the bathroom. The right shade of blue laminate fitted in nicely with the Kardean sample I’d shortlisted for the bathroom floor, A laminate for the ceiling was chosen too, a warm shade of cream.
The layout of the galley was discussed and notes taken on dimensions of cupboards and drawers that are important to us. My homework is to provide a comprehensive list of dimensions through the boat. My original drawings had quite a lot of information on them, more would have made them hard to read, but now specifics are needed, so the drawing equipment will be taking over the dinette table again.

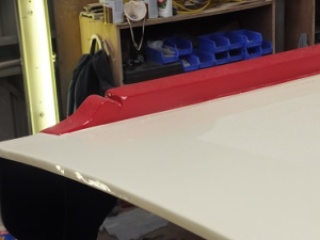
Oleanna had moved into the fit out workshop and was sitting there on her own, suspect another boat will join her at some point. A look at the paintwork with lots of explanations as to the positioning of lines, the dimensions of them etc. This was all fine, I had no problems with any of this. But sadly my opinion still hadn’t changed on the bottom line, it still had the shadow on the wrong side of it. My design is as if the light source is coming from above the front of the boat, so the shadows are below and to the rear of lines and sign writing. These things matter to me, I can trompe l’oeil intricate architectural details on theatre scenery, so a shadow in the wrong place will just annoy me for years.
 |
| Tunnel Bands at the stern in the same cream and red |
 |
| Grab rail red, roof cream |
 |
| Bow to stay blue but change to Epiphanes Multiforte at the cratch board for ease of touching up the gunnels |
Every layer of paint has a thickness to it so any alteration has to be considered carefully so as not to show up in the shine on the cabin side. The line and shadow need to be in the same position just the other way up, so there is a chance that they can mask off the existing paintwork and repaint it. We are waiting to see what the painter thinks and if there is any other solution.
 |
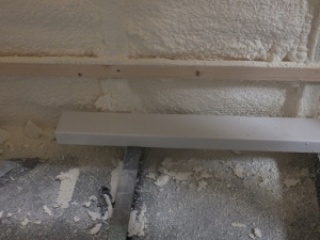
| Roof cross members covered in timber |
 |
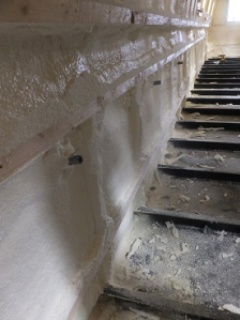
| Everything spray foamed apart from the floor and Mick! |
 |
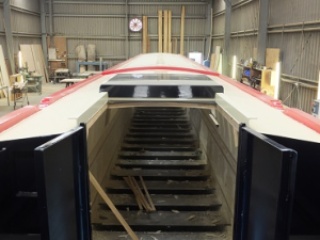
| Looking to the stern |
Now that Paintgate was dealt with we climbed inside to see what had been happening. The cabin sides and below the well deck were all spray foamed. This is a foam that when sprayed expands and then hardens, you can get it in a spray can for filling holes in walls. The foam is the boats insulation and protects the interior of the steel shell from condensation.
 |
| Covered window |
Timber had been added to the metal supports on the shell, these are to fix the cabin linings to. All the windows had been covered with panels of wood which were being removed and excess foam was being cut away. The letter box hole at the rear (ventilation) was full of foam and was invisible.
 |
| Pipes are for waste water from sinks, washing machine etc |
The floor/bilge is left unsprayed, this will soon have paving slab ballast added in between the cross members. Anything that requires extra depth needed to be agreed on today so that any modifications could be made to the structure before the ballast is added. We are going to have a urine tank under the floor for our composting toilet so some modifications to accommodate it’s position may be needed.
 |
| Large conduit to run under the floor for water pipes |
On top of the cross members on the base, joists will be added for the floor to be laid on. On most boats the water pipes run in boxing along the cabin floor at the sides, we however will have ours running below in a large conduit, which will have access points at any joints in the pipework. This will mean that our floor extends to the cabin sides and as our shell is a Birmingham square no tricky angles will get in the way of cupboards or sofas.
 |
| Electrics will go in the black conduit in the corner |
Up at ceiling level another conduit has been run in the foam for power cables.
 |
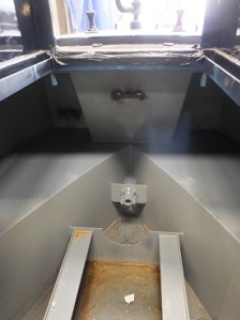
| Under the well deck where the water tank will go |
 |
| What is this? |
The space under the well deck is where the water tank will be. On the underside of the well deck was a metal loop, if anyone knows what it is please let us know, Ken didn’t know either. We suspect it is left from the fabrication from the hull and will be ground off when the water tank is fitted.
 |
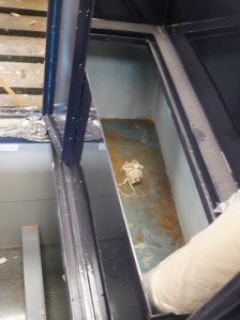
| Water tight engine bay |
Climbing up onto the stern we noticed a nice detail in the anti slip. Subtle but still visible. Inside the engine bay we already seem to have water! This will be from when she has been stood outside, good thing is that it hasn’t drained away meaning it is water tight. Next time we visit I’ll have to measure how wide the openings to the stern lockers are to see if a normal bucket will fit.
 |
| Stern Locker |
 |
| Anti slip on the roof |
The roof has been anti slipped and the masking is where the mushroom vent holes are in the ceiling. We are not sure where the semi-flexible solar panel is planned to be fixed as yet as there was no obvious space left without anti slip.
 |
| Standing on the weed hatch |
 |
| View from the stern to bow |
A sneak look on board a boat that is almost complete to look at the flooring. It was a Kardean tile wood effect, fine if you like that sort of thing, but we’d rather real wood. This boat has been built for a very tall chap and the interior height is vast. The cabin sides have been built deeper to accommodate this.
Back on the engineering side of Oleanna, we were given details and some choices on boilers, alternators etc.
 |
| Engine bay with hull identification numbers |
 |
| Stern locker |
Heating wise our ideal is to have a Bubble corner stove with back boiler, which would heat the boat radiators for much of the winter. Back up would come from an Alde 3020 boiler which runs off LPG. The advantage of this boiler is that it will also work from mains electricity when hooked up. However as the boiler has an aluminium coil you can’t have copper in the system. Mixing the two heating methods to the radiators is also complicated and may end up costing a lot. Finesse would normally fit an Eberspacher boiler as standard which is another option cutting out the copper problem. But it may be that finances dictate that we can’t have a back boiler on the stove. Now that Ricky understands how we see ourselves keeping warm he can chat to an engineer about the options and come back to us.
Domestic alternator upgrades were discussed. The standard one would be 60 amp, but we could upgrade it to 80 amp or go to 100 amp which is over three times as much money extra. Our current boat
NB Lillyanne has a shoreline at the stern and bow, which we have found is very useful so the extra money is worth it.
 |
| Gas Locker |
Different options for the urine tank were discussed and possible adjustments to the cross members in the boats structure to accommodate a larger tank. Currently we are looking at a stainless steel tank under the floor with a built in whale pump so we can empty it into another container for disposal. We would also want a way of manually pumping the tank out should anything go wrong.
The bow thruster has also been priced up. 10 HP Vetus with two batteries fed on a split charge system.
We have become used to sneaking up on fishermen and being able to talk to each other rather than shouting, so a hospital silencer is also on the list.
 |
| Looking out onto the well deck |
The problem of the freezer and where to put it was discussed. Originally we wanted it under the dinette seating, but the height of the freezer was an issue. We have been trying to think where else it could go, the only other option was under our bed, but I have difficulty sleeping with ticking clocks let alone freezers turning on and off, so this we ruled out. An adjustment of how they build the dinette seating and maybe an extra 10 mm of height should accommodate the freezer.
We left with various decisions to make on the extras, a paint colour to find to match the bathroom ceiling, drawer and cupboard dimensions to collate.
Like this:
Like Loading...


Very impressed Pip, shame on your stripes hope it gets sorted to satisfaction.Your model is a credit to you, seeing it in 3D takes a lot of the I wonder if's out of the equation I suspect.The boat is coming along nicely, finish looks excellent, exciting times ? .
Thanks Ade.